Digital Economy
Freelancing In the Philippines: How to Be Tax-Compliant

It’s the golden age of freelancing, and that also means we are golden egg-laying geese for our country (Philippines). We pay taxes. Being tax-compliant is important and will always come up.
There’s a reason Benjamin Franklin said nothing’s certain as death and taxes. It’s inevitable. If you don’t do your taxes, even inadvertently, it can sooner or later bite you in the asparagus. So one of the most important to-dos in freelancing is getting yourself registered at the BIR so you can file and pay taxes.
Depending on how you started as a freelancer, you might be enjoying this as your first earning gig, or you might have shifted from corporate. Either way, you need to file tax correctly. When you do, it opens up the whole world for you. Literally and figuratively.
Travel and business goals aside, it feels good to contribute to your country’s coffers, to work within the law, to know you’re a good citizen.
Here’s everything you need to know about tax compliance as a freelancer, in the Philippines.
Why you should do your taxes as a freelancer

It’s illegal not to file and/or pay taxes. You are earning money. You pay tax when you earn a certain amount of money. Even when your income amount or loss exempts you from actually paying taxes, you still need to file taxes. That’s why we call it “filing taxes.”
You face jail time of two to four years if you don’t pay taxes. The government can also seize your assets down the line, and you might have a hard time acquiring any in the first place. For instance, bank financing, HDMF and Pag-ibig all require your taxpayer record.
On the flipside, the benefits. A smoother, faster process in all things money.
First, earning money in the first place: if you plan to do corporate or professional gigs locally, companies and individual consumers are advised to work with BIR-registered providers/contributors only, who can issue official receipts (OR). That can be you, if you are BIR-registered and you can issue ORs.
Second, investing and spending your hard-earned money. Being a taxpayer is proof that you honor your obligations, so it’s a requirement and an immediate plus for loans and everywhere else you need proof of your financial means and responsibility, like credit card and VISA applications.
For future-proofing. You may start as a freelancer now, but since freelancers are self-starters, you might grow as a business into a small or bigger enterprise. Maybe you already know the tax rates and you know you won’t owe taxes at your current earning range. But what about later when you start earning more?
You need to be diligent about being compliant now, or there will be questions and penalties later.
Your BIR tax type
The BIR tax types categorize citizens according to income sources. As of this writing, Filipino freelancers are in the category of self-employed professionals.
These two terms also help as you register:

- Professional, Non-PRC: If you’re asked, you can tell them you are non-PRC. Meaning you don’t belong to those professions under the Professional Regulatory Commission (PRC), doctors, lawyers, architects, engineers, etc.
- Professional, In General: The BIR officer assisting you will ask what you do and find your code in the PSIC (Philippine Standard Industrial Classification), so be specific. Tell them what you do.
You can get familiar with the whole PSIC list in a PDF here. It’s mind-boggling that the PSIC was updated only once so far, in 2009, but it still works. All the work we do for digital is there.
For example, digital advertising is in Section M, Division 73 Advertising and Market Research. Graphic design is in Division 74 Other Professional, Scientific and Technical Activities. Technical Writing is in Section R, Division 90 Creative, Arts, and Entertainment Activities.
TIN and registration requirements
Your taxpayer identification number TIN is the gateway to everything. Sometimes all you need for other financial applications is your TIN. And of course, you need a TIN to pay taxes.
Important:
- You can only have one TIN.
- If you have been employed, you already have a TIN, registered by your employer.
- You can call the BIR trunkline to find out the RDO (Revenue District Office) where your TIN is currently registered.
- You can transfer your TIN from your current RDO (where your employer registered it) to your new RDO (your residence/place of business now). You need Form 1905 (Application for Registration Information Update/Correction/Cancellation) and submit it personally to your current RDO. They will process the transfer of your TIN to your new RDO.
- You can also call that RDO to ask if they transfer TIN via email, fax or courier.
- This transfer takes three business days.
- If you don’t have a TIN yet, go to your RDO to get your registration done properly and accurately.
- BIR people are nice enough and happy to help.
- The online registration is opaque and you want to avoid mistakes that can literally cost you money in penalties.
Documents to bring and accomplish:

Get photocopies. Photocopy everything.
-
- Valid IDs: Bring at least two. Get photocopies. Each ID should have your complete address. You need this at the BIR and for your cedula (optional) and occupational tax payment.
- If the address in your ID is not what you will use for registration, you need a barangay certificate and bills (Meralco, credit card, water) under your name as proof of address
- NSO Certified birth certificate (original and photocopy): Be prepared to lose the original in case they decide to keep it. Otherwise, they just look at it, return it to you, and take the photocopy.
- Community tax certificate (cedula) and barangay clearance: You pay these at your barangay office. The barangay clearance might require a HOA (homeowners association) certificate depending on where you live.
- Occupational tax receipt (original and photocopy): You pay this at your city/municipal hall’s treasurer’s office.
- You’ll be asked what you need at the entrance. Tell them you need an OTR. If they don’t know about that, mention the PTR (professional tax receipt) instead. That’s more common– it’s what licensed professionals pay.
- You need a valid ID here.
- Photocopy the receipt.
- BIR Form 1901 (two copies): This is the Application for Registration form. Fill it out with answers you’re confident about. If in doubt, ask. You don’t have to complete it at the outset. A BIR officer can help you with the rest, like your PSIC code. See above.
- BIR Form 0605 (three copies + photocopies of the receipt): This is the payment form for the registration fee. To avoid the rigmarole of finding and lining up at an authorized agent, pay this via Gcash.
- Valid IDs: Bring at least two. Get photocopies. Each ID should have your complete address. You need this at the BIR and for your cedula (optional) and occupational tax payment.
If you do pay at an authorized bank (BPI, Landbank, and so on), you present the Form 0605 when you pay. They take two copies: one for the bank and one to be submitted to BIR. They give you the third along with your receipt, and yep, photocopy that receipt too so you can show it to BIR as proof of payment for the RF.
- BIR Form 1906: This is for Application for Authority to Print Receipts and Invoices (ATP). You issue authorized receipts as you work. Official Receipts! This is great especially if you do corporate gigs. Companies want that OR from their freelancers/contributors. And you need these OR for your bookkeeping.
- Minimum print of 10 booklets with 50 pages of receipts each. That makes sense so you’re good for a year or more.
- Your Official Receipts need to be printed at an accredited printer. Your RDO will give you a list. Or your RDO can have it printed. This assistance is included in the printing fee. It will take 1 to 2 weeks.
- At your RDO, all you need is the Form 1906 to have your receipt booklets printed.
- At the accredited printer, you’ll need photocopies of Form 1906 (ATP), Form 0605 and the receipt, and your BIR Certificate of Registration (COR)
- BIR Form 1905: (Yes, the same Form 1905 like for the transfer of RDO mentioned above. It’s a multi-use form). This is for the Registration of your Books of Account, stamped at the BIR. You need two permanently bound books, easily bought from local office supplies.
- General ledger
- General journal
- Intent to avail of 8% Tax Option (1 copy, Optional). This is one of the the income tax rate options for freelancers and it’s exactly as the name says: you pay 8% of your total revenue as tax. More on Tax Rates below.
- DTI Registration (Optional): This is for registering a business or trade name. As a designer or photographer, for example, when a business name is almost a requirement, right? It’s gratifying to have it there on your OR, too.
- This can be accomplished and paid online via Gcash. Your certificate will be sent as a PDF.
- Special Power of Attorney (SPA): If you’re sending someone else to deal with all of this for you while you chill– I mean, work at home, you need this SPA.
Payments to expect:
- The registration fee: 500
- All the photocopies.
- The cedula: Anywhere from 50 to 100+
- The barangay clearance: 100-250
- Optional – your HOA certificate fee: Same as the cedula
- The occupational tax: 200 to 450
- Documentary Stamp Tax (DST): 15 to 30
- Official Receipts printing of 10 booklets: 1500 to 2000
- DTI (Optional): 2000
Other considerations to expect:
- Your RDO might be quite far from where you live, so prepare for that trip.
- Expect it to take an entire day. Accept the traffic and queues to contend with. Just take a day for it and chill.
- You’ll attend a seminar. This is usually required and you get your Certificate of Registration afterward.
- So your registration can take one day, your seminar can be scheduled on a different day, and you might need to come back to pick up your COR and Official Receipts (the receipts you will issue– more on this below) on yet another day.
- You’ll hop back and forth for photocopies. They usually have chairs for the queues. Trooping back and forth and up and downstairs with the paperwork: Wear good shoes.
- You’ll also hop around paying for things (your cedula, your OTR. More on this below). For your BIR Registration Fee, you can pay for it via Gcash. So make sure you have the app and pray the location has a nice data connection so you won’t have to line up at the nearest authorized agent bank.
The process

- With all the above requirements, go to the window for New Registration and submit all your documents.
- This is when you can get help completing Form 1901 as the BIR agent goes through everything with you. Talk to the BIR officer about switching from Employed to Self-Employed if you were previously employed
- Ask about getting them to print your Official Receipts (OR) booklets.
- Pay your Registration Fee.
- You may also pay for the OR printing.
- Get back to your BIR officer with the proof of payment.
- Your BIR officer will advise you about the seminar dates and when you can pick up your COR. Ask about when the Official Receipts booklets will be ready so you can pick up both on the same day, if you like.
- Register/get your books of accounts stamped at the Registration of Books window.
You’ve successfully registered when you have all these:
- Your COR (BIR Form 2303)
- Registered and stamped books of accounts, ready for your use
- Your Official Receipts booklets, ready for your use
- Received copy of Form 1901- Registration
- Received copy of Form 1905 – Registration of Books
Tax-Compliant Freelancing
Registration is just the first step. Now you’re ready to file and pay your taxes. Being tax-compliant as a freelancer means paying your taxes before the deadlines.
In this section:
Think of taxes as a quarterly and annual activity. It becomes part of your life. Just like… general cleaning you do for the house and your workspace every few weeks.
You learn to keep receipts of certain expenses and it becomes a habit to be diligent with your bookkeeping so you’re not piling it on yourself when the deadlines loom.
Another option is hiring a bookkeeper or paying for online platforms/tools to keep things in order and prep your taxes for you.
If you’ll go the tax DIY route, it can also be simple enough. It’s a matter of submitting your tax forms and paying before the deadline.
Let’s get to the deadlines first.
Tax Filing Deadlines
Annual Registration Fee (Form 0605)
- 500 pesos
- January 31 every year
Renewal of books of accounts
- Oct 1 to last working day in December
- Bring new books to RDO for stamping
Quarterly Percentage Tax (Form 2551Qv2018)
- First Q: April 25
- Second Q: July 25
- Third Q: October 25
- Fourth Q: January 25
Quarterly Income Tax (Form 1701Qv2018)
- 8% or graduated tax rate, whichever applies
- First Q: May 15
- Second Q: August 15
- Third Q: November 15
Annual Income Tax Return (Form 1701A)
- The last quarter payment of the taxable year
- 8% or graduated tax rate, whichever applies
- April 15 the following year
Late filing and payments come with penalties and extra hassle: you have to file them at an authorized agent bank or collection officer/deputized municipal treasurer (if there are no AABs) to collect the penalties.
The forms mentioned above are all available online at the eBIR hub. More about this below.
Tax rates
As you can see in the above deadlines, we file two types of taxes: the income tax and the percentage tax.
First, a refresher on terms that will come up again and again:
- Total revenue or gross income: This is how much you earn for the quarter or year. Gross income doesn’t count bonuses, benefits, and so on. Go here for the complete list of what goes into gross income and what doesn’t.
- Taxable income: This is what remains when you remove the allowable deductions, the work expenses/costs from your total income
- IT: short for income tax
- IT rate: the income tax rate you choose to pay (see below)
The percentage tax
This is simple enough: you pay 3% of your taxable income for that taxable quarter.
- If you choose the 8% IT Rate, you don’t have to pay percentage tax. See below.
The income tax
When you earn less than 3 million pesos per year, you can pay your income tax in two rates:
- 8% IT rate – You take 8% from your total revenue and that’s what you pay. You also don’t have to pay percentage tax when you choose this IT rate (BUT you still have to file the percentage tax form. More on this below).
-
-
- Many freelancers opt for this IT rate.
- However, if you’re earning more than 250,000 every quarter, make sure you calculate the graduated IT rate first to see which rate saves you more money on taxes.
-
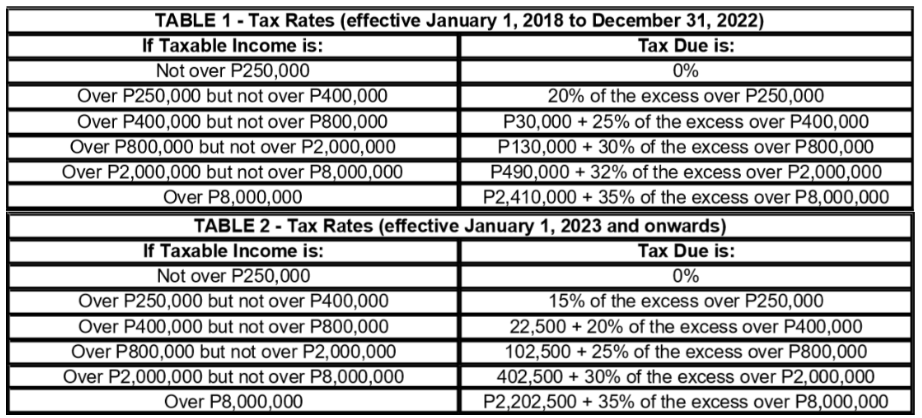
- Graduated IT rate – This refers to the BIR Tax Rate table. Graduated, meaning the amount you pay depends on your taxable income.
- To calculate your taxable income, you also choose between two options for deductions: Itemized Deduction and Optional Standard Deduction (OSD)
- OSD is simple and this is what most freelancers who use the graduated IT rate opt for: you deduct 40% from your gross income and the remaining amount is your taxable income.
- Itemized deductions sound exactly what the name explicitly says: you itemize the qualified deductions from your gross income. This is where you’ll use your stamped books of accounts. If your expenses/costs exceed 40%, it makes sense to use Itemized Deductions. According to the BIR, itemized deductions include the following:
- Expenses
- Interest
- Taxes
- Losses
- Bad Debts
- Depreciation
- Depletion of Oil and Gas Wells and Mines
- Charitable Contributions and Other Contributions- Research and Development
- Pension Trusts
Important: You select an IT rate and you stick with it for the taxable year. You can only switch IT rates on the next taxable year. So make sure to calculate which IT rate saves you more money on taxes.
The 8% IT rate looks economical especially with that percentage tax exemption, but the above tax rate table doesn’t apply to the 8% IT rate. You’ll always pay that 8% of gross income in excess of 250,000.
Let’s say you had a gross income of 350,000 for Q1 when all your clients were ramping up marketing for the year and you had a ton of tasks, yas.
- At 8% IT rate, you pay 8% of the 100,000 in excess of 250,000.
- Gross income: 350,000
- Taxable income: 100,000
- Your income tax due is 8000.
- Percentage tax due is 0.
- Total taxes: 8000
- At the graduated IT rate with OSD of 40%, your taxable income from 350,000 is 210,000.
- Gross income: 350,000
- Taxable income: 210,000
- That’s less than 250,000 so your income tax due is 0.
- Percentage tax due is 3% of your taxable income: 6300.
- Total taxes: 6300
On the flipside are also instances where you save more with the 8% IT rate.
Let’s say you had a gross income of 875,000.
- At 8% IT rate, you pay 8% of the 625,000 in excess of 250,000.
- Gross income: 875,000
- Taxable income: 625,000
- Your income tax due is 50,000
- Percentage tax due is 0
- Total taxes: 50,000
- At the graduated IT rate with OSD of 40%, your taxable income from 875,000 is 525,000.
- Gross income: 875,000
- Taxable income: 525,000
- According to the tax rate table, your 2022 income tax due is 55,000.
- Percentage tax due is 3% of taxable income: 15,750
- Total taxes: 70,750
How to pay your taxes
Make sure your ledgers/cash receipt/cash disbursement books for your gross sales/income summary and deductibles are in order. Your numbers come from these books.
What to record:
- Date of payment
- OR number
- Name of client
- Amount paid
- Notes (E.g. What was the payment for?)
Example cash receipt entries:
| Date | OR Number | Client Name | Amount | Notes |
| 01/14/2022 | 0001 | John Doe | P30,000 | Full payment: site content |
| 01/16/2022 | 0002 | Mary Jane | P15,000 | Half-payment: site content |
| 01/23/2022 | 0003 | Mary Jane | P15,000 | Half-payment: site content |
If you choose the Itemized Deduction for Graduated IT, these books need to reflect those transactions to the letter.
- File the right forms. Every payment/tax has its own form.
- Annual Registration Fee: Form 0605
- Quarterly Percentage Tax: Form 2551Qv2018
- Quarterly Income Tax: Form 1701Qv2018
- Annual Income Tax Return: Form 1701A(NEW)
Download all the forms from the eBIR Forms.
- This download is a zipped file.
- Inside the zip is an .exe file. This installs the BIR app to your computer.
- When you run the app, you’ll see that it simplifies form filling. Simply select the right form, enter your TIN and other details, and off you go.
- The forms calculate your tax due according to your input.
Important: When the TRAIN law was put into effect in 2018, there were new forms made and uploaded but the old forms are still in the BIR pack. Make sure to select the forms labeled (NEW) or (V2018).
- Once you’ve filled out the correct form, click Validate. Validation means everything’s accurate and in order.
- Once your form is validated, you can now click the Submit button. Make sure you’re online. This sends the form to BIR.
- Save the form as PDF and print the form(s) in A4.
- If you have taxes or fees due, print 3 copies.
- Within a few hours, you’ll receive the Tax Return Receipt Confirmation (TRRC) from the BIR. Print this email so you have proof of filing.
- You’ll also need this TRRC in print for the next step.
If you don’t have taxes due (i.e, at 8% tax rate with less than 250,000 gross/taxable income and zero tax due for percentage tax) and no penalties to pay, your tax filing ends here.
That’s it. You’ve filed your taxes. You are tax-compliant.
- Next, pay your taxes. Take your printed forms and the TRRC to a BIR-accredited agent bank for payment.
- The bank will stamp the form/s as proof of payment.
- Along with your receipt, you keep one stamped copy of the form/s, the bank keeps one, and sends the other one to the BIR.
- You can also pay your taxes through Gcash. Save the Gcash receipts/screenshots and upload them to a Google Drive folder as backup.
That’s it. You’ve paid your taxes. You are tax-compliant!

Here’s a DIY tax-compliance guide for the forms, with screenshots.
The more you do it, the better and more comfortable you get. You’re a business. You can take rightful pride in what you do when you’re tax-compliant.